Pages

Saturday, November 22, 2014

How To Adjust the Clip Preview Volume In Ableton

Lots of us producers have extensive sample collections. So we frequently find our selves searching through giant lists of samples, some of which are very loud and compressed.. If you work like me, your project's overall volume isn't all that hot so when we reach for a new sample, the loud one can blast you! But, fortunately there is a way to adjust the preview volume.

While in session view just take a look at your master channel. At the bottom there is a blue knob that controls your preview/cue volume.


Hope this helped you guys! If it did please subscribe to us on YouTube and like us on Facebook

Making a Directional EQ in Ableton

A directional EQ is an amazing tool. It allows you to place certain frequencies in specific areas of stereo space. There are plug-ins out there that do this but there is no need for paying extra cash for something you can do with just Ableton's live devices.


Now, mind you, this is not perfect and can create some resonance if used excessively. So, be cautious and use sparingly. Less is more in this case.

You can download this audio effects rack on the downloads page.

If you liked this tutorial and you found it helpful please subscribe to us on youtube.

How to make an EDM Drum Kit


Tuesday, October 28, 2014

Pseudo Broadband Compression

Broadband compression is where you allow only a certain range of frequencies to trigger your compressor. So, if you track is extremely bass heavy (like the one in the example) it allows you to not have the bass heavy kick drum trigger the compressor and make the rest of your track duck and pump when that kick hits. This is perfect for when you are mastering hip-hop or EDM. Take a look at the video.


You can check out the full song here...


If you enjoyed the tutorial please, click the subscribe button and if you like the music follow my studio's sound cloud page :) Cheers!

Multiband Sidechain Compression

Mulitband sidechain compression is where you use one audio signal to compress a certain range of frequencies of another. Why do this? Two situations where this can help you the most are trying to make a kick drum and bass guitar sit together and also getting vocals and guitars to sit well in the mix. The basic idea is to make the competing frequencies "duck" out of the way of each other so one doesn't mask the other. For example, we can make it so every time the lead singer is singing, the sidechain compression on the mid range of the guitars that shares similar frequencies get triggered to make way for the vocal. This way you can have guitars and vocals that are both in your face but aren't battling for space. Take a look at the video below to see how we achieve this.


You could even take this one more step further, by using the EQ8 and an audio effects rack you could split the signal into mid/side and have it only compress the mono data. But that's another video :)

Hope you enjoyed the video and learned something, if you did hit that subscribe button!

Tuesday, October 21, 2014

Plug-in Review: Thrillseeker VBL


Overview 

Released in mid 2013 by Variety of Sound, the Thrillseeker VBL emulates the old vintage broadcast limiters of the 50s. It's designed to give you that harmonic tube distortion we all love from vintage analog tube compressors while working in the box. The Thrillseeker VBL has fixed attack and release times that are slow compared to modern brick wall limiters. Regardless of the slower fixed attack and release times, I have put it to good use on many things from acoustic drums, electric guitars, bass guitars, vocals, synths and just about anything. Oh, and the coolest part, it's free.

Cool Features 

When you start to drive this compressor it will start to add some "analog" harmonic distortion, which is not harsh at all and can really fill out sounds very nicely.

Between your "Amp" and "Brilliance" controls you can dial in some great sounding "analog" distortion to fill out just about anything.

When heavily compressing your audio you will start to hear a "pumping" effect, you can turn up the "Emphasis" control to help tame it.

Turning up the "Bias" control can create more focus on high frequencies.

Rating: 5/5
Price: FREE
Format: 32-bit VST only

I would recommend Thrillseeker VBL to anyone working with audio, you will find something it does great no matter if you are producing, mixing, or mastering.

You can download Thrillseeker VBL HERE

Thursday, October 16, 2014

Compression Basics

Knowing how to use a compressor is one of the most valuable pieces of knowledge you can have as a producer or engineer. Compression is a huge part of the sound of modern music and has been a huge part of music production and engineering for years. In this video I got over the four basic parameters you find on most compressors, whether its an analog unit or a plug-in, which are the threshold, ratio, attack and release. Check out the video below to hear my explanation of each one.

Tuesday, September 16, 2014

How To De-ess in Ableton Live

So there probably is a few ways of doing this but this way I find sounds great and will not effects anything thing else, just your problem sibilants (T's and S's to be specific). It won't carve out any unwanted frequencies and make your vocal sound dull either. The basic idea of this technique is to use the problem to get rid of the problem. We'll isolate the sibilants and use them to duck them out of the source track. It might sound confusing, maybe only because I suck at explaining things, but once your see it done step by step it makes total sense.

Check to video out below


How To Make A Howard Benson Style Delay

I was watching Pensado's Place not too long ago and it was an episode with Howard Benson. During the interview he mentions a unique way he using delays. So, me being me, I had to try it out. What Howard does is create 2 delay sends, one panned right and the other panned left. He sets them both to the same timing (1/4 note for example) but then takes another delay (fully wet) and sticks it right in front of one of the delays and delays it further by 10-30 milliseconds. The result is a huge stereo delay, that isn't a ping-pong.

Check out the video below to hear this in action and to learn how to do this along with a little expansion to get a huge great sounding delay.


Sunday, September 14, 2014

How To Create a Bob Brown Style Delay

Hey guys here is my first tutorial on my new YouTube channel.

In this tutorial I discus how to create a Bob Brown style delay. I'm sure this isn't the official name and I am unsure where it originated but Bob did it best and he own well known for doing this. This technique originated in the analog world but I will show you how to do it in Live.

So what the hell is a "Bob Brown style delay" anyways? Well, this is when you take a send track with a delay and instead of using the feedback on the delay effect, you take and loop the output back into the input (which is what feedback is, basically). So why do this? The main and most apparent advantage of doing this is that you can add effects to your feedback loop, so with every repetition your signal gets more and more processed.

Check out the video below to see it in action and to learn how you can do this in Ableton Live.


Sunday, February 16, 2014

2 Free Max For Live Devices

Hey guys, all today I have been messing around with M4L and make a few cool devices.

First we have the Fancy LFO. Well.. I guess it's not too fancy but it's alright. You can switch between LP, HP, BP and notch style filters. Also, when using LFO, you can set the minimum and maximum frequencies of the modulation depth, instead of hav to use a single depth control. 

The second is FN:RAM. When random is activated, generates a random frequency every quarter note that modulates the volume. The high frequency modulation creates some unique and crazy textures.

I will be adding these to the downloads page so you can check them out for yourself. 

Fancy LFO


FN:RAM (Fourth Note Random Amp Mod)


Wednesday, February 12, 2014

Making 808s That Thump


This tutorial I go through making 808 style kicks using operator and some audio effects.

Check out the downloads tab to download a free 808 kick sample pack

Create a center detent knob using Mapulator

You will need Max For Live and the Mapulator Max Device.

Download Mapulator for free here

Ok, you might be like, WTF is a center detent knob??? The most common example of this on DJ mixers. It is a knob that is a hi-pass when you turn it to the right and low-pass when you turn it to the left. Sweet huh?

So lets get started.

Load up Mapulator and 2 auto filters, one a high pass and one a low pass.


Highlight them all using SHIFT+click then group 'em using CTRL+G.

Macro the "Smart" knob on macro 1 or your MIDI controller knob or whatever.

Click the frequency on one of the auto filter then click "Learn" on mapulator. Do this for both. Make sure you choose 2 different parameters in the parameter drop menu.

Now move your macro and watch the line move back and forth, pretty huh?
Click to add modulation. Create a line that starts low and gets high just slightly before the middle for the LP and a line that is all the way down and starts rising just after the middle, I wouldn't have them exactly in the middle if your using a controller, just so you have some leeway.


And BAM! There you go:) Enjoy.

Use an Xbox 360 Controller as Midi Controller

This is taken from an old post I made on Ableton Addicts. I updated the DL link, enjoy.

**You need a WIRED 360 controller

Ok, It took me forever to find out how to do this with out Max Runtime. I found a tutorial on how to do it with FL Studio, but it had some holes, and no one that ever used controllers before might not had got it. So I'm making one for Ableton Live 8. Also I believe this method will only work with PC, unless you find similar software that will run on Mac (should work in 9 as well)

You will need MidiYoke, Bome's Midi Translator Classic, and Avis Rejoice, and the Microsoft 360 Controller driver to do this.

Always check for updated versions ^^

I packed them all in a .rar for you.. download it here

1. Make sure your controller is plugged in to a USB port and that you have all the listed software installed.

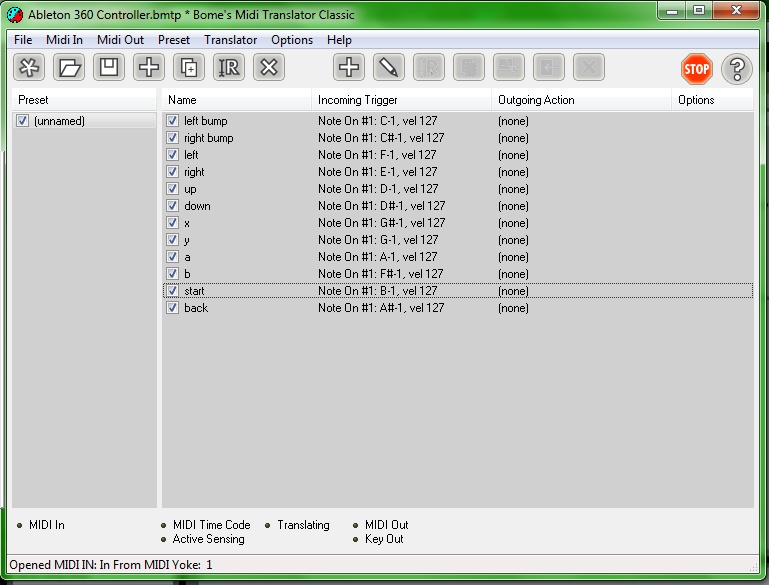
2. In Rejoice towards the right of the middle section click "Note On" then press and hold a button on your controller, there will be a value that shows up, and click "Add" Do this until you add all your buttons. There will be a list of all assigned buttons at the top.

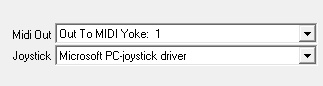
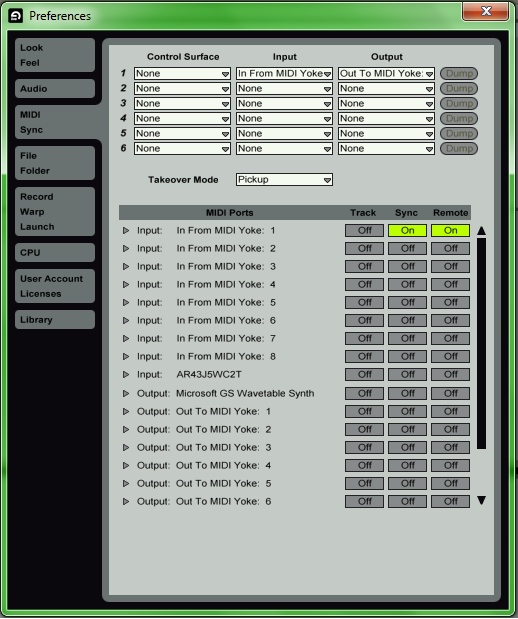
In the middle in the "Midi Out" drop menu select "Out To MIDI YOKE: 1"


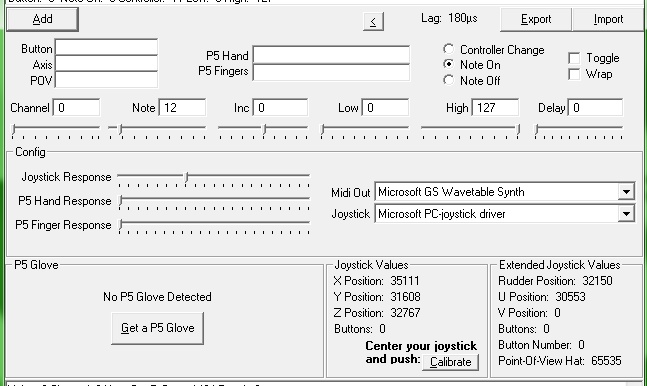
(I know its wrong in the picture, change it from your default)

Then at the bottom click "Route MIDI" and select "MIDI Yoke: 1"


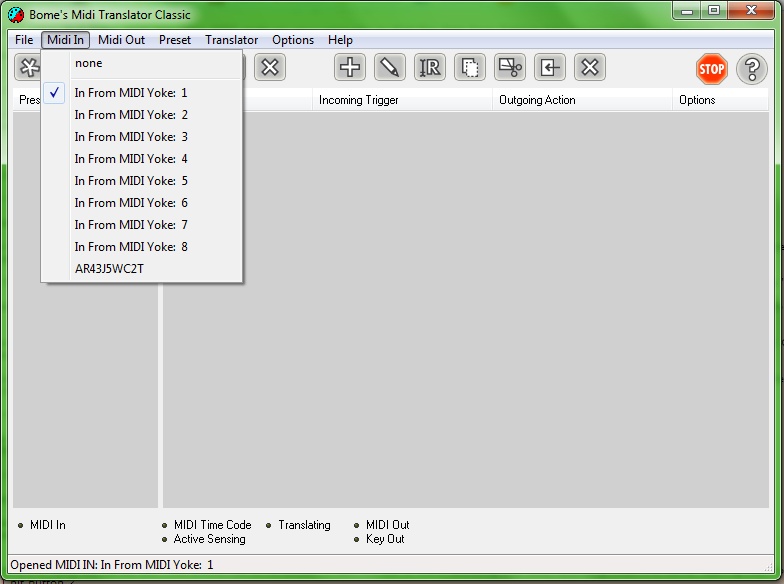
3. Run Bome's Midi Translator Classic.
go to "Midi In" at the top and select "MIDI Yoke: 1" you will not need a Midi Out selected


4. Click the "[+]" in he middle that says "Add New Translator" when you hover over it.
Name it after the bottom you will press. Keep doing this until you have a list of all your buttons.

5. Right click a translation and click "edit" (or double click)


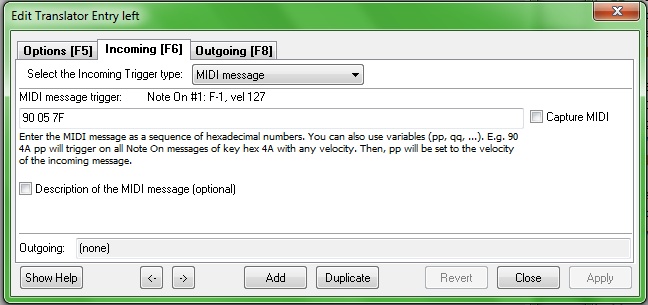
Then, click the check box that says "Capture MIDI" then hold down you botton for that translation the uncheck "Capture MIDI" then press apply, you must be holding the button when you uncheck the box
(Repeat process for all buttons)


7. How to Map MIDI controls in Ableton:
Press CTRL+M and click on what you want to map then press the button you want to map the press CTRL+M again and now that control is mapped


Have fun!

Download Page Updated

Hey guys just finished updating the downloads tab, check it out for free analog and operator racks, audio fx racks and a free vst.

In the near future I will be posting a Dubstep Snare pack and an 808 Kick pack.

Peace!

Layered Vocal Delays


In this tutorial I show you how to make great sounding vocal delays using live's devices

Welcome to my blog!

Hey everyone my name is Jordon Renn AKA CyroTactix, I create Ableton Live tutorials and plan on giving away some sample packs, live racks, presets and even free royalty free music.

With the launch of this Blog I will be 'uping the standards' of my tutorials, making sure they are more clear, have a more professional feel.

Hope you enjoy!